Custom Reed Valve with Carbon Fiber Reed
The four best ways to enhance power is improve the engine porting, increase the compression ratio, make a Jaguar pipe, and perfect the jetting. I used to think that installing a reed valve was key to improving power untill I did an honest back-to-back test. [see video] Now I know that the main advantages of a reed valve are easier starting and idling, and less intake noise. Below are drawings of the prototype I made that bolts onto the engine intake before the carb inlet and protrudes into the engine, coming within 2 mm of the piston. 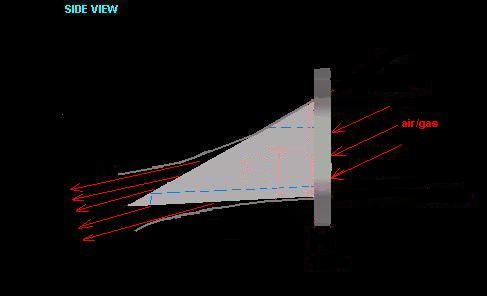 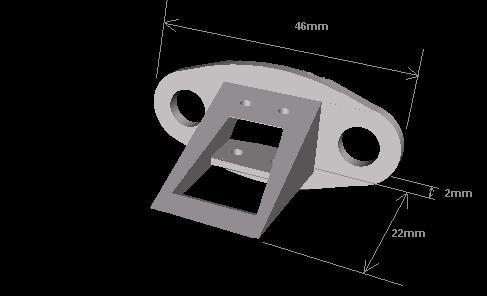 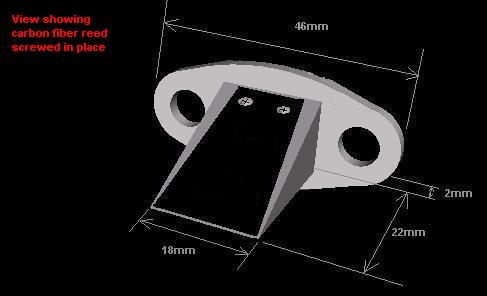 Here is my prototype which I used successfully before any of the below listed reed valves were ever available. I made it with aluminum from a cooking pan and JBWeld, and a thin carbon fiber. That worn off curved part in the middle of the reed is where it was hitting the piston. I made it that way on purpose to maximize the crankcase compression ratio. 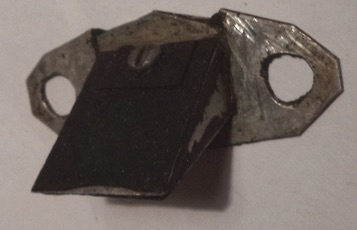 Here is the reed valve I next used for $30 from Rock Solid Engines, and the one from CNC Racing for $50. The CNC flows more and so would be better for racing. 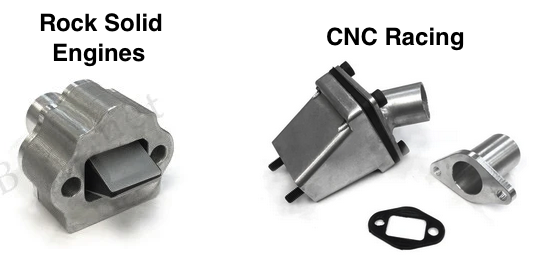
Here is a chart showing what carb sizes are needed for different engines. For a lower RPM than 8500 you can divide your RPM by 8500 and then multiply that by the carb area. Carb area = (.5 x carb size) x (.5 x carb size) x 3.14 and then convert that smaller area to carb diameter by this formula: dia = 2 x square root of (area / 3.14) 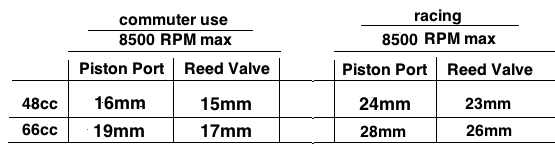
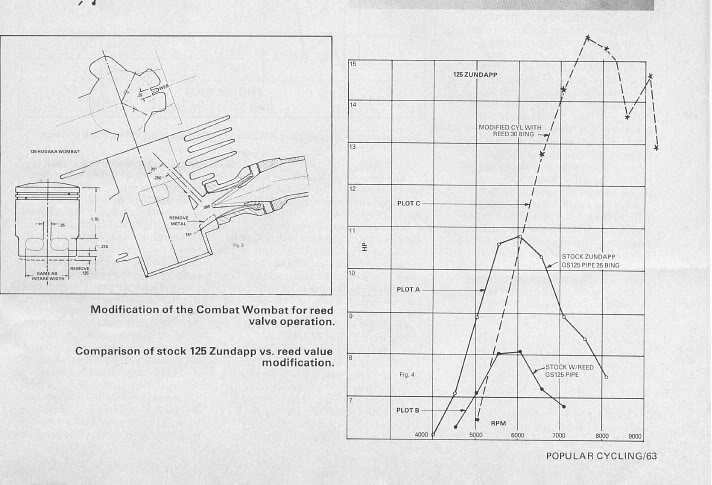
The drawing and graph below show how Zundapp power was increased by 50% by addition of reed valve, holes in piston, a boost port at the same height as the transfer ports, and a bigger carb. Power was reduced though by 25% by only adding the reed valve without the other mods. (My carb size calculator shows the 26mm carb on the unmodified engine was 53% oversized which probably did reduce power.) The graphic below shows how boost ports can be dremeled as troughs in the intake side of the cylinder wall. They chose to also cut out a portion of the piston skirt instead of only drilling holes, but I dislike that approach because it imbalances the piston weight too much from front to back. Like they show here it is also advantageous to lower the intake port. For the HT you can lower it 5mm (to 60.5mm from cyl. top) at the intake port and cut 5mm from the bottom of the pistons intake skirt to the same width as the intake port. With this 10mm total the piston skirt starts to fully open the intake port at 85° BTDC. But this is only good in conjunction with a reed valve. 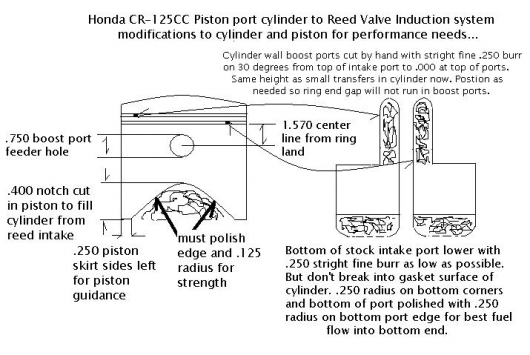 The illustration below shows how I have drilled the holes in my piston. The inertia of the air/gas pushed up into the cylinder through the transfers at BDC requires that there is at least one row of holes completely open when the piston is at bottom dead center so that the vacuum caused by the upward air/gas movement will draw more charge in through the reeds which allows more charge to enter the upper cylinder. The lower edge of the lowest hole needs to be around 35mm from the top corner of the piston. A good size drill bit to use is 7/32". 5 of those holes have about the same amount of area as the open reed valve of Rock solid. When the top row of 3 holes start to be closed by the top of the intake port (on the upstroke) is when the bottom of the skirt starts to open up the intake port which more than compensates. 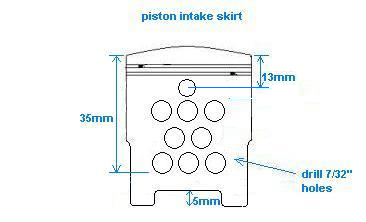 Here I list the tools recommended for modifying ports and the piston skirt bottom edge. I use the round bit and the oval bit for making the boost port, and the cut-off wheels for everything else. Black & Decker 3-Speed RTX Rotary Tool $31 Carbide Rotary Diamond Burrs Set $14 Dremel 688-01 69 Piece Rotary Tool Cut-Off Wheel Set $10 I experimented with boost port size and settled on the width as 30% of the combined transfer ports widths (.3 x 40mm= 12mm). Using only 5.5mm wide for my 48cc engine allowed me to climb one street at 18.5mph whereas before it was at 17.5mph so even a little extra helps. It is important to keep the groove very shallow near the top so that the mixture will be directed upward instead of towards the exhaust port. I used a round 5/16" dremel cutter bit to cut the groove. The height of the boost port should be the same as that of the transfers if you don't stuff the crank. If you do then make the port 1mm higher. It should be deeper as it nears the intake port. The mod for the Combat Wombat (Hodaka 125cc) made it 25 degrees from vertical. Most likely you will have to use a larger main jet when you incorporate a boost port or you will probably lose top speed as I did. I use a #79 with my 60cc engine with 14mm Dellorto carb and torque pipe. Boost ports boost power but reduce gas mileage. The last one I made for myself was at a measured angle of 13 degrees from vertical. 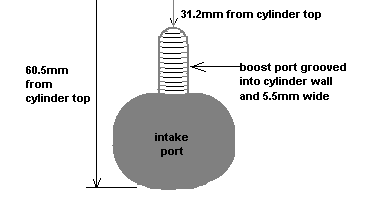 The following drawings (made to scale) show the positioning and functioning of the boost port, piston skirt holes, reed valve, and direction of intake air/gas mixture. 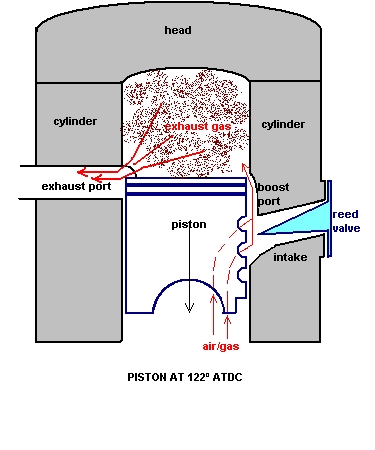 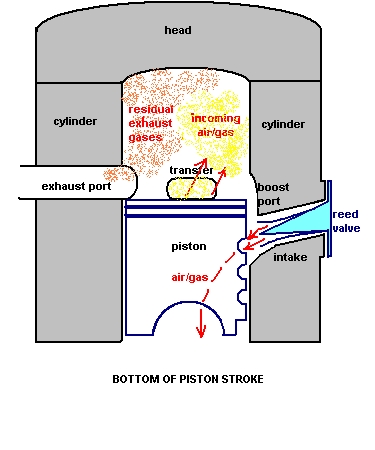 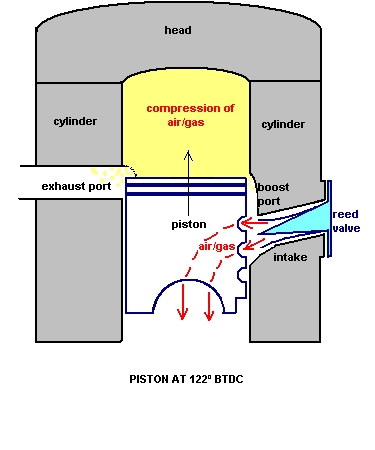 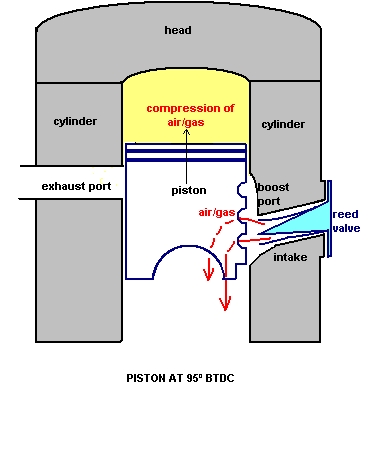   HOME |