Performance CDI by "Jaguar" 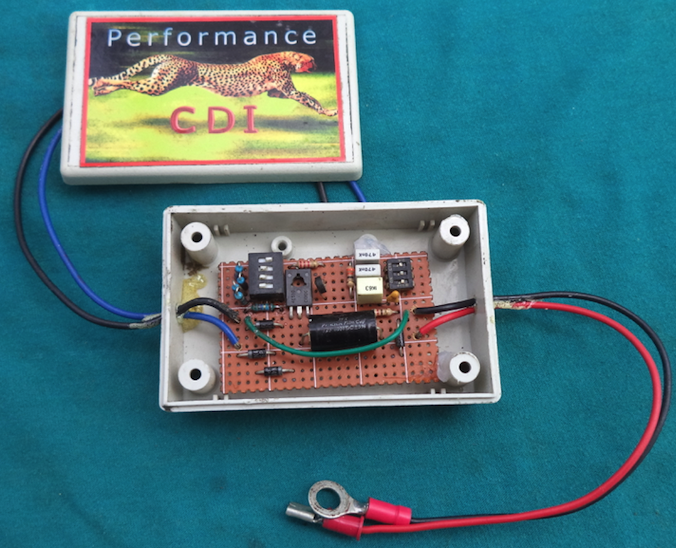 Years ago I owned the international version of the Kawasaki KDX 200 which was a great dirt bike and had a broad enough powerband to also be good on the street. When the CDI went bad I was told about a man that repaired them. He showed me how to dig into them in order to replace the SCR and charge capacitor which are the two parts normally going bad. Being an electronics technician (since 1977) I then figured out the schematic for it and the values of all parts used in it. Then I tinkered around with different values of parts in order to get more mid range power and get more top rpm. I settled on adding 10% more capacitance to the part of the circuit which determines the timing curve. I used that CDI both on the street and on the motocross track. It worked great! I also experimented with different values for the main charge capacitor, the one that holds the peak voltage from the magneto coil. Standard was 1.5uf and at 2uf the ignition system (and engine) would lose power at high rpm. That makes sense because there is a delay time for charging the capacitor and the higher the rpm the less time is available to charge the capacitor. On the Grubee engine 2uf will not allow the engine to run at all. That is because the magneto coil, which develops voltage as the rotor magnet rotates, has more winding resistance and less voltage than the KDX motorcycle. So then I tried a lower capacitance and tested it on the street with amazing results. One uphill street I tested on allowed 14.5mph with the smaller capacitor. With an even smaller capacitor it went 17.5mph! That means the lesser capacitance was charging to a higher voltage which translates to more voltage and current at the spark plug. (More capacitance charges slower and to a lesser voltage level if not given enough time to fully charge. Less capacitance charges quicker and to a higher voltage in the same amount of time.) A CDI ignition system is all about voltage. The positive voltage from the magneto coil charges the capacitor which is manipulated into a negative spike of voltage of the same amplitude to the ignition coil which multiplies it into thousands of volts sent to the spark plug. 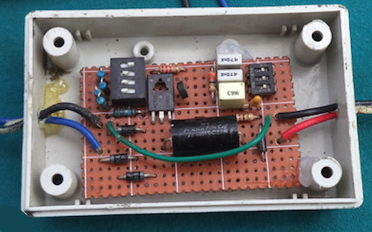 Comparison to the standard Grubee CDI: On one long uphill I use for testing my bike went 20.5mph up it. 15 minutes later with the modified CDI the mph increased by 10% to 22.5! And at high rpm the standard Grubee CDI allowed too much engine vibration. The new Performance CDI cut that in half for a much more pleasant ride. Since more engine power is derived from an increase in spark power then I figure the Performance CDI has 133% more spark power! [read more] This data is from the research paper "Devices to improve the performance of a conventional two-stroke spark ignition engine" which includes these statements: "With the high energy ignition system, combustion stability is improved due to high spark discharge, which initiates the combustion process more effectively at higher compression ratios and with leaner fuel-air mixtures compared to the normal ignition system. At a high compression ratio of 9:1, with lean fuel-air mixture (A/F=15.2), the maximum improvement in brake thermal efficiency obtained with this high-energy ignition system is 16.5% (at 2.76 kW, 3000 rpm)" (Thermal efficiency is the ratio between the mechanical power output and the heat content of the fuel consumed.) Using an electrical tester I made that puts 100 volts into the CDI as the charge voltage I measured a maximum spark gap with the standard Grubee CDI/coil of 1.5mm, and with my Performance CDI with KX80 ignition coil the maximum gap was 4.7mm, and with the CR80 coil the gap was 10.3mm! So this is a motorcycle CDI which has selectable timing curves and a smaller charge capacitor to accommodate the weaker magneto coil voltage. It has four wires, two which connect to the blue and black wires from the stator coil, and two which connect to the ignition coil. Two of the wires need to be soldered to their mating wire and then the heat shrink tubing shrunk over the exposed metal for good insulation. For connection to my bicycle frame I just use double sided foam tape and electrical tape. I ride on bumpy roads and it stays in place. The ignition coil is held in place with a hose clamp. To connect the ground wire to a grounded frame ignition coil you'll need a 1/4" diameter bolt, nut, and washer. Below is a drawing showing how to connect to the ignition coil. 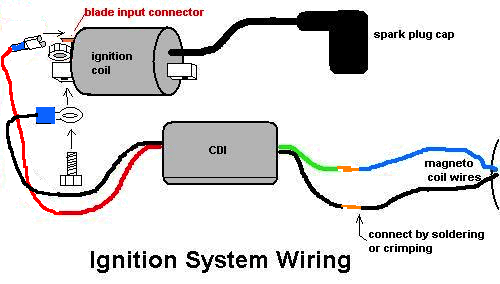 Here is how to wire your own kill switch. This is the standard way which is to use a switch to ground out the stator coils output. The switch you can use with this method may be a miniature toggle switch or a larger rocker switch. Mouser Electronics sells a waterproof switch for $2.34 that you can use if your ride is exposed to much rain. Or you can use a regular switch so that its toggle is facing down so that raindrops will not enter the switch there. 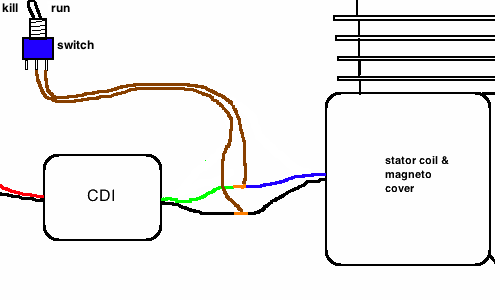
CUSTOMER FEEDBACK: "Micheal, I just came back from a test ride, and I am very pleased with your CDI's performance. The power feels smoother and it feels like I have more top end. The bike runs like I visioned it would when I started the build. I don't think I could ask more from a single cylinder. I am very happy, will spread the word, recommend it to everyone, and after the Death Race I hope you will get more orders when I beat the Morinis." "I want you to know that your CDI works GREAT! The motor pulls strongly at low and high RPM's. Thank You!" "Now there are no more misfires which were common with the stock coil, and about an extra 1500 rpm! Also a noticeable difference in acceleration and power as my engine no longer sputters along. It was a good investment, worth every penny!" "ALL my engines have had a consistent problem with bottom connecting rod bearing failure, but this was largely attributed to the standard CDI giving an ever increasing spark advance with increasing rpm's. Since fitting the Jaguar CDI I have not had any more bearing failures; in my case, the only reason why all 7 engines failed. All these engines failed at around the same time; between 700 and 750 kilometers [around 450 miles] - surprisingly consistent, and my oil/fuel ratio is 20:1 with the old engines and the new engine. With the Jaguar CDI I now have approx 3,000 kilometers on the 8th engine which was rebuilt with a new crankshaft, although the new crankshaft is of the crowded roller design." Questions & Answers What if I feel inadequate
to properly set the switches to an optimal position? Then
just leave the switch positions as they come because they are set for
engines that haven't had their exhaust port raised for higher RPM. Does
it matter whether or not the engine is modified? Not at all.
It improves performance of both modified and non-modified engines. But
engines modified to rev higher will benefit even more. There is one
modification I recommend for all users of this CDI if you don't have the "slant" angle fire head (which has more compression); remove metal from
the head mating surface to increase compression. This CDI has less peak
timing advance because it is the perfect match for engines with more
compression. Click here to read about how
to do it. Is
there any possibility of danger to my engine by using this CDI?
No because all of the timing curve of this CDI is less advanced than
the standard CDI so it actually enhances engine reliability. It does
increase head temperatures a bit though because of more consistent
combustion due to the stronger spark. It's best to make sure the carbs
main jet is not too lean, and use a cold #7 or #8 NGK plug. To double
check everything you can always buy a digital head temperature gauge for $27 from Amazon. How
can I test it to see that it produces a hotter spark? Just
take out the spark plug, connect it to the spark plug cap, hold the
spark plug onto the cylinder head so that it is grounded, and with dim
lighting (best at night) push the motorbike and you will see the actual
spark. Do this same routine with the standard ignition system before
changing to this new system so you will have a point of comparison. How can I trust the timing curve graphs on this site? You can watch my video that shows the timing advance and then retard as RPM changes. The graphs are definitely not just made up. People riding motorized bikes are either poor or don't/can't have a drivers license and I am above all things an empathetic person. I would be the last person to try to deceive them because I've been poor most of my life. I love the golden rule- Do unto others as you would have them do unto you. Shouldn't ignition timing
be advanced at high rpm since there is less time available for
combustion to peak at 10-15 degrees ATDC (the ideal spot for
peak pressure to occur)? Up to what RPM is the Jaguar CDI good for? Up to 12,000 which is more than the stock engine can be ported to rev to. A normal max is 9000. You'll need a motorcycle cylinder with more ample transfer porting to rev higher. And for that I recommend also getting a stator (magneto) coil that outputs more voltage to strengthen the spark. Comparison to competitors CDI: The "Lightning" CDI maintains the overly advanced timing curve which makes the engine run too hot and is hard on the bearings. Also, along with high engine compression, excessive ignition timing can cause detonation. The competitors may be OK for stock engines (power-wise) but is terrible for modified engines. The Jaguar CDI is better for both stock and modified engines because it is completely tunable to match the engine. Here is a graph showing the difference in timing curves: 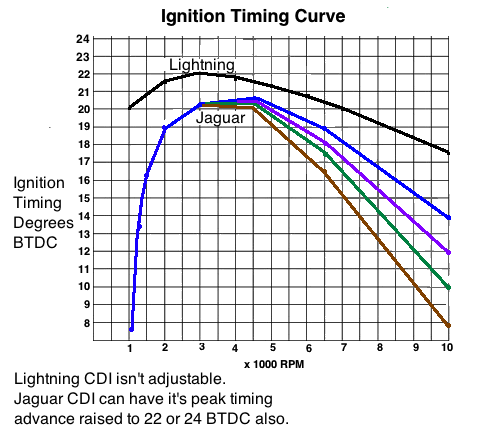 The Lightning is too advanced at low RPM (possibly allowing backfire when starting) and too advanced at highest RPM (adding to engine heat, detonation, wearing out bearings prematurely). Here is a picture of a piston with only two hours of running in an engine with detonation. Aluminum leaves the piston top and sticks to the cylinder head and to the cylinder (leading to seizure). 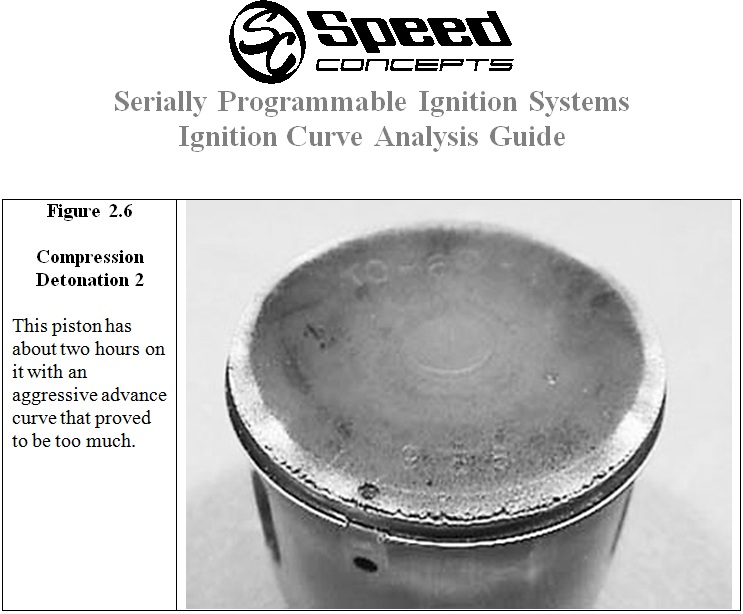 Here's a picture of me with a second place trophy
in Paraguay after racing my KDX200 with modified CDI against the
country champion in the "enduro bike" division: 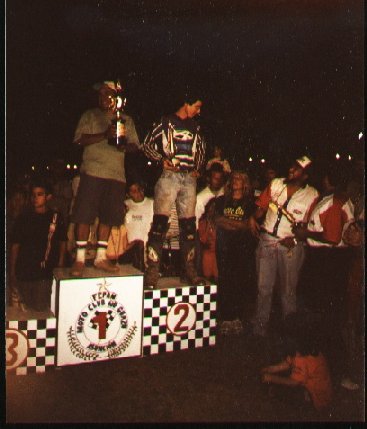 Can I use any motocross CDI? Not likely. Most all others make use of a sensor in the magneto system for telling it when to send the voltage pulse to the ignition coil. The Chinese engine doesn't have that. What if I don't know how to solder?
Then read this online soldering tutorial for beginners: How do I insulate the exposed connection afterwards? Included with the CDI is 4 pieces of heat shrink tubing (available also at Radio Shack). Please put the black heat shrink tubing on one of two wires before soldering them together. Then slide the tubing over the exposed solder connection and move the soldering iron back and forth over it so that the heat causes it to reduce its diameter and provide a tight seal over the metal. What if I need to extend the CDI wires to be longer than they are? Just buy these to extend your wires: Hookup Wire (22AWG), Heat-shrink Tubing. What if it stops working and I would rather troubleshoot it and fix it myself instead of sending it back for a replacement then what should I do? Go to this page for instructions. Warning: If you use a spark plug with resistance (such as Iridium plugs) then you need to use a non-resistor spark plug cap. Otherwise the spark current will be reduced for a weak spark. If you have a non-resistor spark plug then you need to use a spark plug cap with resistance (5K ohm). Without it the excess spark current may burn out your high voltage coil. Nick Delahunty in Australia now manufactures my Performance CDI and sells them for $100 USD plus shipping cost ($18.50 to USA). He can be contacted at nicka.d@hotmail.com or click here for his facebook page. His comes with a high voltage coil with non-resistor plug cap that is for plugs without nipples. Click here to read how to adjust the performance CDI. If your favorite spark plug (iridium) has a non-removable nipple then also get a spark plug cap that works with nipples. If you try to contact him but he doesn't respond then you can ask me if I have one to sell. 19jaguar75@gmail.com Buy a resistor spark plug - NGK BPR7HS (or BPR8HS if the engine is ported to rev higher) if the threaded section needs to be 13mm long, or a NGK BR7ES (or BR8ES or BR9ES if the engine is ported) if the threaded section needs to be 19mm long. This is important so that the piston won't hit the spark plug. I would recommend the iridium plugs (they end in IX) but they normally don't have removeable nipples which Nicks setup needs since his spark plug cap works only on plugs w/o nipples. His product is pictured below before the electronic components are epoxy sealed so they won't be damaged by oxidation caused by humidity. (The plug cap on the one I sell matches plugs with nipples. Click here for instructions with my CDI.) 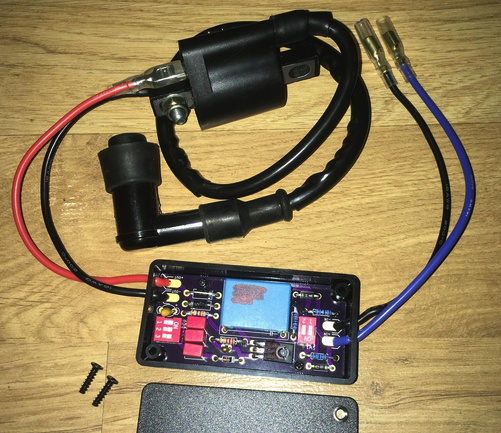 Most NGK's available are cheap copies prone to failure and without the right heat range, especially on Amazon. Go to this page to see a list of autherized NGK distributors. Contact Michael:19jaguar75 @ gmail.com (remove the spaces around @) |